http://www.pri.org/stories/2012-02-23/new-clues-emerge-centuries-old-swedish-shipwreck
"Vasa set sail on her maiden voyage on August 10, 1628. At the time, she was the most powerfully armed warship in the world, with 64 bronze cannons.
Twenty minutes into her journey, the ship was hit by two strong winds. It heeled to port, water gushed in, and the ship sank less than a mile into the journey.
Thirty people died.
"We have, over the last three years, measured every single piece of the wood in the ship," says Hocker. "If we want to understand how the ship was built, that's what it takes."
Hocker's meticulous measurements paid off. They gave him fresh insight into what made the Vasa unstable.
For one thing, the ship was asymmetrical, more so than most ships of the day.
Why was the ship so lopsided?
While examining the ship, Hocker discovered four rulers the workmen had used. Those rulers were based on different standards of measurement at the time.
Two were in Swedish feet, which were divided into twelve inches. The other two were in Amsterdam feet, which had eleven inches in a foot. So each carpenter had used his own system of measurement.
"When somebody tells him, make that thing four inches thick, his four inches is not going to be the same as the next guy's four inches," says Hocker. "And you can see those variations in the timbers, as well."
Moral of the story, it pays to pay attention to your units, measure and create everything as exactly as you can! (Warning: If your original drawings were not constructed exactly, it is going to show up when you start trying to dimension everything.)
Skim through chapter 6
Clarity:
- Avoid clutter, use the minimum number of dimensions.
- Dimensions should not overlap or interfere with drawn object.
- Units are provided in title block, not in drawing.
- Use consistent font and spacing
- Place dimensions outside of views rather than in the drawing object itself.
- Place dimensions between views
- Do not dimension to hidden lines or T joints.
- Use extension lines for angled features.
Dimensions are drawn with thin, dark lines (0.25mm)
What is wrong with this picture?
too many sig figs, cluttered, #'s not aligned, etc. etc.

Sketch some of the WS's out of chapter 6
Construct dimension in Layout space to see how txt sizes appear on paper.
- create a dimension layer:
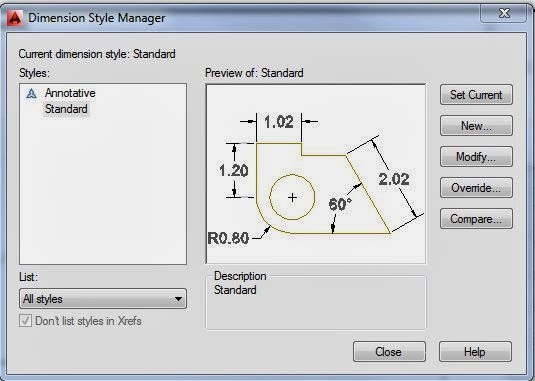
Set your dim styles: type "DIMSTYLE" into the command line
Click "modify"
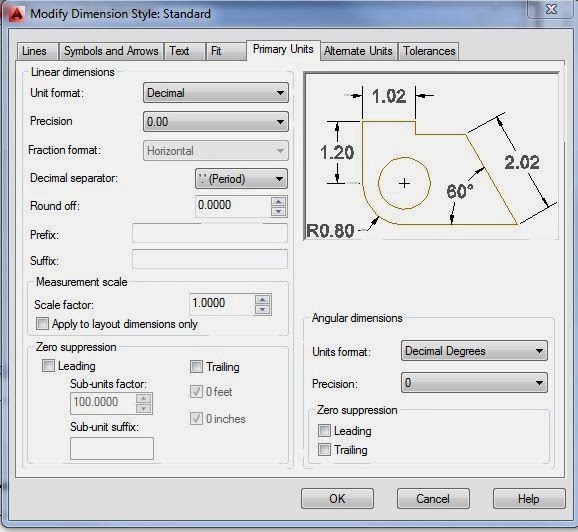
Set your precision to 0.00
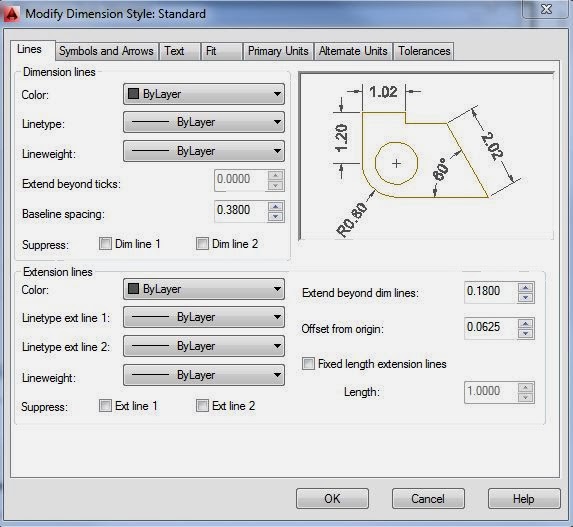
Set your text height, align horizontal. You might have to play around with your text height a little to get it to match your scaling factor.
Set all your line types to "By Layer"
Choose "Set Current" to apply settings to dims.
Open up your Annotate tab, and have a look around.
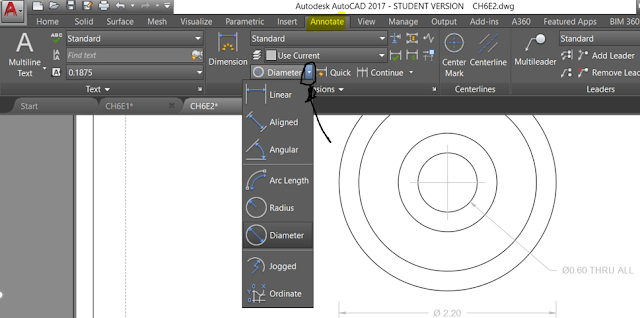
DimLinear - for horizontal and vertical measurements.
Click "modify"

Set your precision to 0.00

Set your text height, align horizontal. You might have to play around with your text height a little to get it to match your scaling factor.
Set all your line types to "By Layer"

Choose "Set Current" to apply settings to dims.
Open up your Annotate tab, and have a look around.

DimLinear - for horizontal and vertical measurements.

Use options in [the square brackets] to rotate text etc.. (you should have set this up already in your dim styles, but if you need to change something...) Just watch your command line every step of the way!!


You can also select a dimension → right click on the dimension→ select properties → then modify precision, text size, etc.
DIMRADIUS,
DIMDIAMETER: Measures the radius or diameter of a selected circle or arc and displays the dimension text with a radius or diameter symbol in front of it. You can use grips to re-position the resulting dimension.
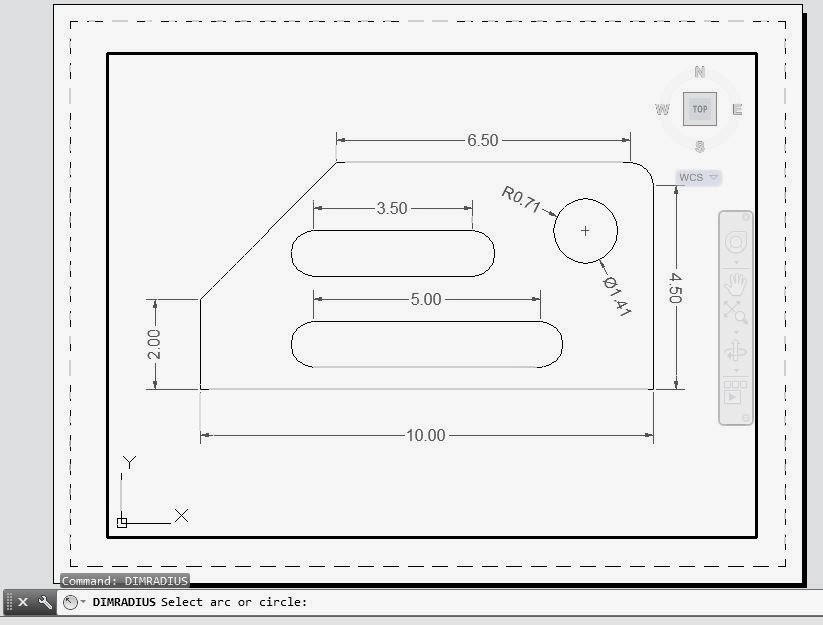
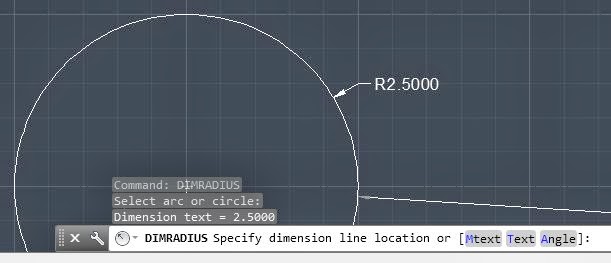
DIMDIAMETER: Measures the radius or diameter of a selected circle or arc and displays the dimension text with a radius or diameter symbol in front of it. You can use grips to re-position the resulting dimension.


DIMARC: Arc length dimensions measure the distance along an arc or polyline arc segment. The extension lines of an arc length dimension can be orthogonal or radial. An arc symbol is displayed either above or preceding the dimension text.
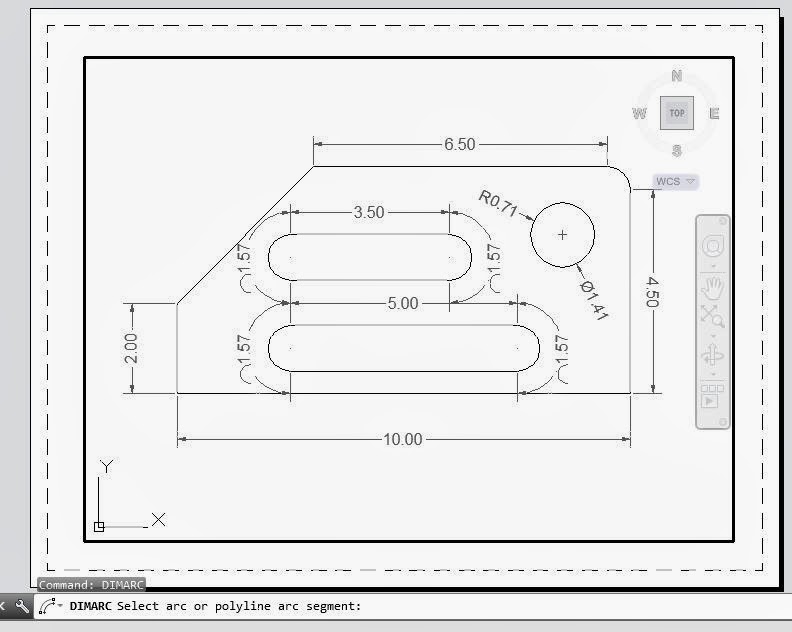


DIMANGULAR: Measures the angle between selected geometric objects.


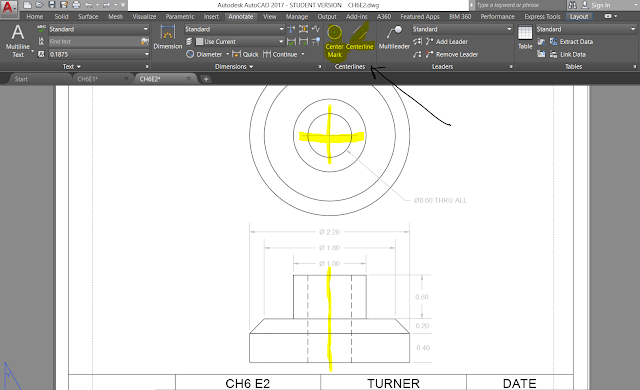
CENTERMARK
CENTERLINE
Creates the center mark of circles and arcs.
DIMORDINATE: (X,Y) (15, 12.5)
UCS - User Coordinate System. Define where (0,0) is on your object, then use DIMORDINATE to measure points from your UCS


DIMBASELINE:
First, select dimlinear, dimangular, etc.as your baseline, then add additional dimensions.
First, select dimlinear, dimangular, etc.as your baseline, then add additional dimensions.

DIMCONTINUE
Automatically continues creating additional dimensions from the last linear, angular, or ordinate dimension created, or from a selected extension line. The dimension lines are lined up automatically.
Automatically continues creating additional dimensions from the last linear, angular, or ordinate dimension created, or from a selected extension line. The dimension lines are lined up automatically.

DIMSPACE:
Adjusts the spacing between linear dimensions or angular dimensions.


DIMSPACE:
before:

after:

EXTEND: draw a construction line, use it to line up all the dims.
from:


DIMBREAK:
Breaks or restores dimension and extension lines where they cross other objects.


